By Jonathan Rupert, Smith Seeds
Original Article Published by OnPasture
I have tremendous respect and appreciation for our universities, extension, NCRC, and other public servants. Many of these folks work tirelessly to help farmers. They also collaborate with industry with determining product adaptation, use, rates and the like. Working in the seed industry for over 25 years, I have had the fortune to learn and work with many such folks when it comes to evaluating forage grasses and legumes. We utilize data from their work extensively. So do many farmers. However, their contribution has limitations. And those limitations seem to be increasing, not decreasing. Shrinking budgets and lack of support are killing many research programs. While I want to support those programs as much as possible, I also want to invite you to become your own researcher and start a life-long practice of conducting your own on-farm trials. My hope is that this article will both inspire you and give you some guidance in this practice. Consider it another tool in your toolbox.
On-Farm Trials – What are they?
Simply put, on-farm trials are intentionally planted plots of different plants or practices which you establish and manage on your own farm for the purpose of helping you make better decisions about new products and/or practices. While my examples and focus are comparing forage species and varieties, you can apply these same principles to fertilization and chemical use, as well as general management practices. On-farm trials can be as simple or as complex as you choose. The object of your trials will be to help you answer questions with minimal risk. Questions like:
“Is there something I can plant that will give me better yields that what I am getting?” “I hear a lot of talk about this new variety of clover. I wonder if it will survive on my farm.” “Do cows prefer tetraploid ryegrass over diploids?” “How do those new tall fescues go through summer?” “All this talk about soil health. Should I be doing something different?” “Nothing seems to grow well up on the hilltop – am I fertilizing too heavy? Too little?” “What would happen if I planted two weeks earlier, or even three?” “If I used legumes instead of nitrogen, would I get the same yield?”
This is a surface scratching of the number of questions that you could ask – questions which on-farm trials may help you answer.
My First On-Farm Trial
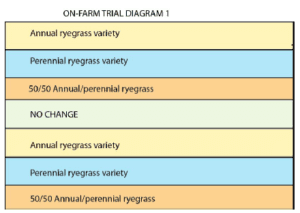
With this in mind, let’s consider some real, practical, and inexpensive ways to become our own evaluators. We will start with an illustration from my first on-farm trial. A couple of decades ago I had a small hobby farm. One fall, I wanted to learn more about the differences and benefits of annual and perennial tetraploid ryegrasses. I was particularly curious about each’s first year performance. In this trial, I divided one acre into six strip and overseeded as shown in Diagram 1. I planted each variety and a combination of the two separately, as well left a strip untouched. Cost? Three bags of seed and a couple hours on a Saturday. Benefit? First, I added grasses seed which improved my pasture stand. This was of utmost non-research importance, because my two young daughters had almost convinced me to buy a horse….and you know what they do to pastures!

Second, I was able to learn important answers (or at least partial answers) to questions like:
- How much faster will annuals grow than perennial?
- How much longer will perennials last than annual?
- Will the combination of the two be better than either individually?
- Will the animals prefer one over the other?
- Does overseeding pay for itself, or should I have done nothing at all?
Look at that last point again. It is a very important question. ALWAYS, if possible, keep some of your old pasture around to compare with the new. By evaluating the old to the new you will be able to determine a great deal more than if you completely revamp the old.
Third, I committed myself mentally to be checking my pasture frequently. Over and over again, I hear profitable farmers reminding one another to get out and walk their fields. Well, in addition to the great direct value of seeing how your pastures are performing, I have discovered that there are also what I call “hidden benefits.” For instance, one memory that sticks in my mind to this day happened when I went out one afternoon to examine my plots. While staring at my grass, one of my momma goats stole my attention. Soon, I found myself on all fours watching her vigorously graze on spring grass. Know what I discovered? I discovered that she can really chomp up a storm! Of course, while I was down on all fours, her 10-day old kid kept trying to jump on my back! But then came another distraction and the greatest discovery of the day! I found a new place to hang a tree swing for my girls.
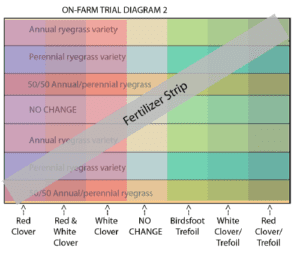
Back to my trials…My curiosity on clovers and legumes gave me the incentive to add a twist to the test plots. You see, I wanted to evaluate particular varieties of ladino and red clover, as well as birdsfoot trefoil. So around the first of March, I took the same area and cross-seeded as shown in Diagram 2, with a grand finale of a diagonal strip of fertilizer to cross all plots.

Cost? Oh, another few small bags of seed.
Benefits? Same as the above three with additional answers to these questions (actually, many more than the ones listed, but maybe that’s because I like to ask lots of questions!):
- Which will come up fastest: Birdsfoot, ladino, or red clover?
- Will the mixtures be complimentary?
- Animal preference?
- Seasonal difference?
- Nitrogen benefit difference?
- Effect on the annual compared to the perennial?
- Did the fertilizer benefit the clovers significantly?
On-Farm Trial Fundamentals
I hope the above example has whet your appetite for on-farm trials. With that in mind, let’s go over some fundamentals.
1. Every year.
The success of conducting your own trial will come over time. Part of the reason for this is that you will learn each year how to do a better job. After your first year, you will be full of should-have, could-have, and might-have conclusions. You will also probably have more questions than answers. But one of the most compelling reasons to conduct trials every year has to do with the term validation. One dot on a page doesn’t make a line; and while you can draw a line between two dots, it takes three to make a trend. It’s the same with one year’s results – it’s just one year’s results. Repetition is necessary for validation. So start with a basic trial. The next year, if you want to confirm your results, plant them again. This will help you in more ways than you can imagine. By doing so, you will learn a bit more how temperature, moisture, and seasonal patterns affect what you are evaluating. You will also be able to see if certain characteristics hold true from year to year. This includes establishment, maturity, dormancy and a host of other critical factors.
The other reason is that it puts you in the mode of doing your own evaluation. It becomes a habit. You’ve allocated space on your farm and included it as part of the cost of doing business. This mindset and commitment puts you at the head of the line to be able to look at many other new varieties and practices. It’s a decision that will provide dividends for years to come. Personally, I have been conducting my own trials for over 25 years, and much of what I know about how different species and varieties perform either comes directly from or has been confirmed by those trials.
2. Try again.
This is similar to point #1, but a bit different. If something succeeds or if it fails, specifically repeat that planting, taking note of anything that may have been a factor which needs adjustment or could have contributed to its performance. Many times, we reach the wrong conclusions based on insufficient information. We see this as it relates to winter hardiness quite a bit, as one year’s winter weather can vary significantly to the next. Also, if something seems to work, but you are not sure you want to plant it from fencepost to fencepost, take it to a larger scale evaluation.
3. Multiple replications and locations.
In the example above, you will notice that I had multiple replications of each entry. This is an important part of trialing. It helps take away some of the chances that one plot had more success or failure due to where it was situated in the plot. Maybe that plot received more or less water, or maybe there was residual chemical issues on that spot.
Furthermore, as you venture out into this new world of on-farm testing, you will likely want to look for multiple locations on your land in which you can duplicate your trials. High ground, low ground, dry area, wet areas, traffic, no traffic, high fertility, low fertility. You might find that prior to doing your own testing that you made some conclusions about a certain species or variety that was based on a particular “micro-climate” that doesn’t fully represent the potential of other parts of your farm. You can also share the journey with your neighbors. After your first trial or two, invite some fellow farmers to collaborate together.
4. Documentation.
First of all, make a map of what you planted. Include the date, pH, seeding rate, fertility, and other information that will be important to you once the details fade from your memory. For me, that can be the next day! Then, over the course of time, take notes and photographs, especially as it relates to important times and events. With today’s smartphones, photos are already stamped with the time. I like to carry a small memo book around and note what I have taken photos of, and then edit the photo file names from my notes. You can also make photocopies of your map and scribble notes on the front or back of it. You won’t regret spending the time not only taking the notes, but actually the time that you stop and make the observations for the notes. It is also helpful to mark the edges of each plot or strip containing a different treatment or crop with flags or stakes, along with measuring and recording the width of each.
5. Compare to the known.
It is very likely that you have certain varieties/species that you’ve used for a number of years on your farm. You know how they perform. They are what we call a known variable or a “check variety.” You’ll want to plant this check variety as part of your trials. In a perennial application where most of your farm is already in the check variety, it is best to plant the check anew in the trial area. Why? Because that’s the only true way you can compare it to the other varieties. This way you will be able to evaluate their establishment rate side-by-side, how they go through the first summer and winter, take the first grazing/cutting, etc.
6. Maximize your trial space.
On-farm trials can be a simple as planting 1-2 separate strips down the side of a field, or broadcasting a few square areas in multiple locations. They can also be maximized without much difficulty. In the example above, I started out with only three variables. Then by cross-seeding in ended up with a whole host of different plots. In that trial I was able to see how each of the grasses performed compared to one another, how the legumes compared to one another, and how the combinations compared to each other.
Final thoughts
In this article, we didn’t address the methodology for collecting and analyzing your results. For starters, your first on-farm trial may be no more than an observation trial. From there, you may find the need to learn how to submit forage samples and accurately determine yield. Those are topics for another day. In the meantime, I hope this article has stirred some excitement in you. If so, don’t delay in starting your new journey. Planting season will soon be upon us. Pick a spot. Choose some questions you want to find answers to, and go for it! Also, see if anyone wants to join you. Ask your local seed dealer if they’d be willing to help you. Maybe your extension office wants a place for a field day next year. Regardless, I hope you join me in this very fun and profitable way to learn.
The Next Step: Putting Numbers to Your On-Farm Findings
Genevieve Slocum, King’s AgriSeeds
Using a small area to compare a new product to the crops in your current rotation, or a different management strategy to a tried and true practice, is a great method of hands-on learning. If you decide to set up your own trials on your farm, you will need numbers to back up your observations and really compare different crop species or treatments. Looks can be deceiving, especially because of how much moisture can vary. Two different corn hybrids can look like they will yield the same, but differences in moisture content (which has a direct relationship to plant maturity) can mean big differences in dry matter yield. So, it’s important that you measure not only the fresh weight yield of your forages but also the dry matter yield.
Knowing average yields will also help you be more efficient in matching nutrient and manure applications to crop needs, as well as calculating your forage supply for the year.
The most accurate method is to weigh the truck or wagon loads going into the barn, knowing the acreage that was harvested. You can also measure the wagonload if it can’t be weighed.
- Multiply length by width by depth to find the volume (ft3).
- Multiply the volume by the density (lbs per ft3) to find total weight in pounds, and divide by 2000 to get tonnage and % DM as a decimal (see below).
If this is not possible, you will have to take yield checks using representative samples. This involves using small samples to calculate yield per acre. Make sure you sample from a representative area of the field – i.e. an area that looks like the rest of the field. This means avoiding both unusually thin spots and spots with exceptional growth. Also try to choose spots that represent the species expressed throughout the rest of the field. If you planted a mix of crimson clover, radish, and oats, don’t choose a spot where only radish and clover appear – unless of course the oats failed to grow well and that’s what the field as a whole looks like.
To check yield from a corn crop or other row crop, determine and sample the length of a row that equals 1/1000th of an acre. This varies depending on row width. For example, 1/1000th of an acre of corn on a 30 inch row width would be 17’5” of one row, but on a 36 inch row width, 1/1000th of an acre would be 14’6” from the same row.
Count the plants and multiply by 1000 to find the population. Try to sample spots that have even, consistent spacing of plants if this is what most of the field looks like.
The math works out that you just have to divide the raw weight by 2 to get an estimated yield in tons per acre (or x1000 to get pounds, then divided by 2000 to get tons. Multiply by % DM as a decimal to find dry matter yield per acre.
To check yield in hay and drilled fields, you will need to harvest a sample from a known area, such as a 2×2 foot square, or 4 ft2. Use the square feet in an acre, 43,560, to figure out how much of an acre this is. 4/43560 = .00009183 acres. Say you get 5 lbs from your 4 ft2 sample area. Divide it by the acreage of the sample area to find yield per acre:
5/.00009183 = 54,448.4 lbs/A. Divide by 2000 = 27.2 tons/A fresh weight. Multiply by your dry matter as decimal to find dry matter yield.
If you have a windrow, you can simply sample a section of the windrow, carefully measuring the width and length of the section to find sample size and proportion of an acre as discussed above.
Find out the moisture content to calculate dry matter yield. Measure the weights of the samples before and after drying. They can be dried in a microwave. (See https://www.agry.purdue.edu/ext/forages/publications/ID-172.htm for more information about drying in the microwave.)
- Weight after drying/weight before drying = % dry matter as a decimal (multiply by 100 to get percent number).
- Wet weight x % DM (as a decimal) = DM yield
Moisture can also be determined from a lab analysis. This is the ideal method. You and your nutritionist likely already submit samples for forage analysis to a lab such as Cumberland Valley Analytical Services. Most labs allow you to submit samples for moisture checks only for a small fee. For more accurate results, you can submit two samples from the same plot or strip and find the average of the two.
Randomize and Replicate. Take at least 6-8 samples from the same field, spread throughout the whole area and randomly chosen. These spots should look fairly representative of the field as a whole.
Speak to an expert at King’s AgriSeeds now at 1-717-687-6224 or email us at [email protected].
